Power BI Data Model Governance With Power BI Golden Dataset and Thin Reports
If you have previously worked with Power BI or any other self-service BI tool, then I am sure you have found the incredible value it brings to an organization when making important data-driven business decisions. Users no longer must come from an extensive coding or developer background to ingest data from disparate sources, design and create data models, or perform analysis on their data using a low code development environment.
A common problem, however, is that many users will begin to publish slightly different versions of the same Power BI data model. These various versions can cause problems when trying to manage these models and maintain governance on multiple models that are essentially the same in the back end with different reports attached to the front end.
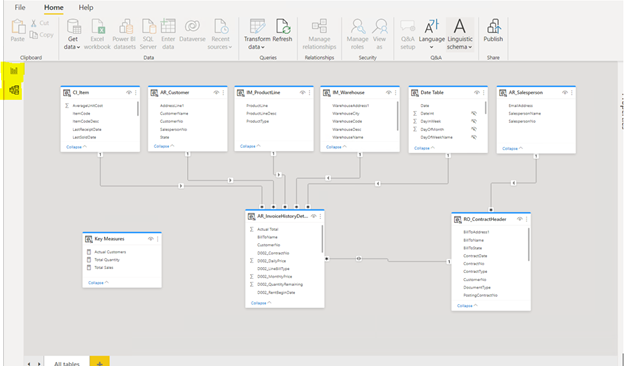
In this blog post, I discuss a quick and easy solution using the Power BI Datasets connector in Power BI Desktop that eliminates ambiguity by creating a single central data model to which users can connect directly to build custom reports and dashboards. These “thin” reports have access to all the same features as when creating a new blank .pbix file, only without access to the data tab (see figure 1). Thin reports don’t actually contain a data model but rather connect to a master model.
Note: A data model and a dataset are the same – the only difference is where the data lives. When the data is inside Power BI Desktop, it is called a data model; then, once it is published to PowerBI.com (Power BI Service), it becomes a dataset.
What Is a Golden Dataset?
A Golden Dataset or Golden Data Model is a single data model published to PowerBI.com and does not necessarily need to have an actual report attached. Once it’s published, users with the correct permissions can connect and build as many thin reports as they like without affecting the model itself. Some of the advantages of leveraging this approach are:
- Only one data model to manage, which eliminates having to toggle between multiple similar data models
- Uses fewer resources such as storage and compute to keep data up to date
- Maintain and improve a single data model with changes that other users can benefit from
- Allow users to create their own custom DAX measures in their .pbix file without affecting the data model
- Use custom DAX measures created by fellow thin report developers in the data model, which promotes collaboration
Let’s jump right into how we begin the process of creating the data model and publishing to PowerBI.com.
Creating Our Golden Dataset
So, we are now in Power BI Desktop. We loaded our data from different sources (Excel, CSV, Salesforce, on-premises software, etc.), made some transformations, created a data model linking our data sources and are ready to publish it to PowerBI.com. Remember that this .pbix file does not have to contain a report to publish to the service.
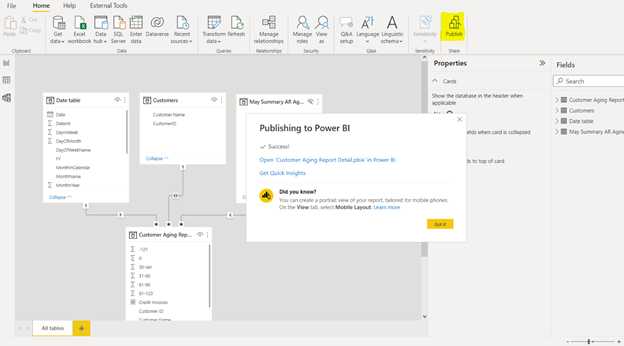
I would also recommend knowing your organization’s policies for creating new workspaces in PowerBI.com before anything else. Once you are ready to move forward, establish which workspace you want to allocate the Golden Data Model. Then from within Power BI Desktop, click Publish on the top ribbon (shown below), then find your designated workspace and finally publish your data model.
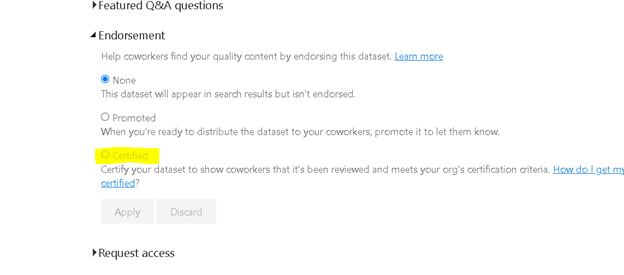
Once the data is published up to the service, it’s best to let your users know that the dataset is ready to use for reporting by marking it certified. Locate your published dataset and click on the three dots to display the drop-down menu so you can then click on Settings. Expand the Endorsements section and click on Certified. If you do not see the Certified option, you currently lack the permissions and would need to contact your admin as only an authorized user can certify content.
Now, guess what? That’s it. It really is that simple to publish the data model up to a workspace, certify it and have it available to other developers in which to build thin reports.
Let’s take a look at what it takes to connect to this Golden Data Model and create a thin report.
Creating a Thin Report
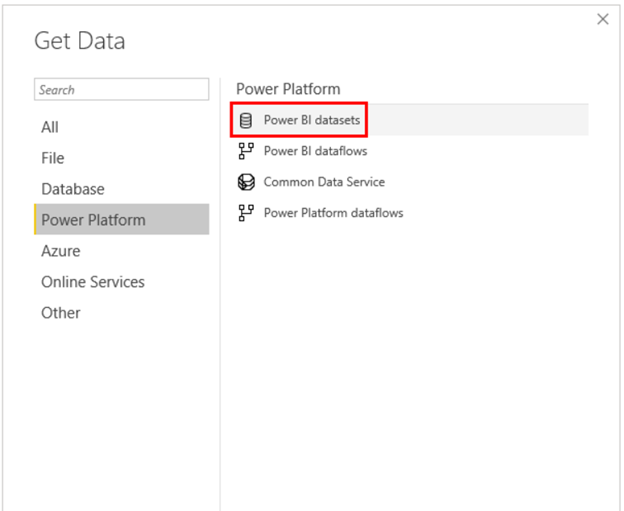
All we need to do now is open a new blank .pbix file and navigate to the Get Data button on the ribbon. Select the Power Platform connectors and click on Power BI Datasets. Once the Data Hub window pops up, select the certified dataset and hit connect. The .pbix file is now live connected to the Golden Data Model. From here, users can create their own custom DAX measures, build custom reports and dashboards and publish them up to another workspace. And just like that, data just became much more organized, scalable and manageable.

In Summary
As you can see, it is quick and straightforward to tighten things up within your Power BI environment by applying the Golden Data Model method and leveraging the Power BI Dataset connector. Of course, there must be some time set aside in the beginning to establish governance and policy in order to remain organized if and when scaling needs to take place. Allowing other developers in the organization to use their business acumen and knowledge of specific processes to access data and build their own reports can enable much more than deeper insights. Putting this technology in their hands now sparks the momentum to create a digital culture where the entire organization leverages data to drive decisions, not the other way around.