With part two of my blog series on accessibility testing, I would like to dive deeper into how to actually perform the accessibility testing needed to move towards inclusivity. See for yourself how to make the digital experience better for all.
How To Do Accessibility Testing?
There are two methods of testing: manual and automation. Automated accessibility checks use specialized software to analyze websites and identify common barriers that may affect individuals with disabilities. On the other hand, manual testing involves human testers personally interacting with the website and creating detailed reports based on their experience. These manual reports typically provide insights into Web Content Accessibility Guidelines (WCAG) compliance issues and progress, including proposed methods.
You can do accessibility testing yourself with a little bit of configuration and computer skills.
High Contrast Mode
You can enable high contrast mode to highlight the content of the website. Simply search the Contrast Themes via the search box or go into your settings. Then, select the high-contrast theme from the preview. You should see your screen changing into inverted colors, similar to the screenshot below:
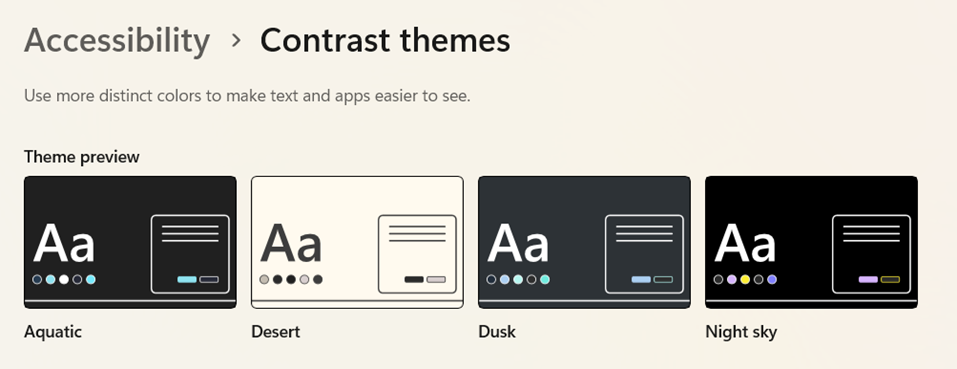
Image Accessibility Through Alt Text
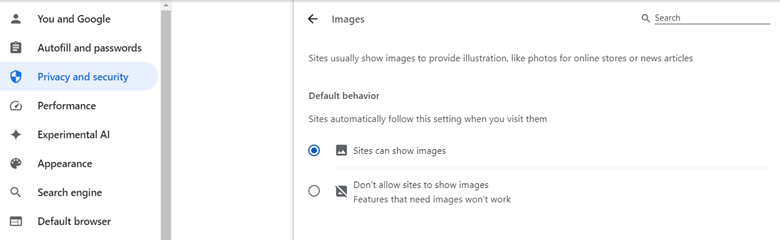
Alt text (or alternative text) is descriptive text that conveys the meaning and context of a visual item in a digital setting. Alt text is normally only displayed when the image is not loaded properly. To enable the alt text to consistently appear, testers must temporarily disable image loading to see if the content remains readable.
In Google Chrome, go to Settings > Privacy and Security > Site Settings. Upon scrolling down, you should see the Image tab. Click on it, and you’ll see under the Default Behavior section, there is the “Don’t allow sites to show images” option. This setting will disable images and replace them with alt text.
Keyboard Accessibility
This type of test focuses on accessing the website using only the keyboard without relying on mouse interaction. Try navigating through the website using only the Tab key to move the focus between links and interactive elements. Use Tab + Shift keys to move the focus backward to where you were previously. After browsing around the web with your keyboard, you should have a better understanding of the functionality and content that can be accessed and operated using keyboard navigation alone, benefiting users who may have difficulty using a mouse.

Font Size Adjustment
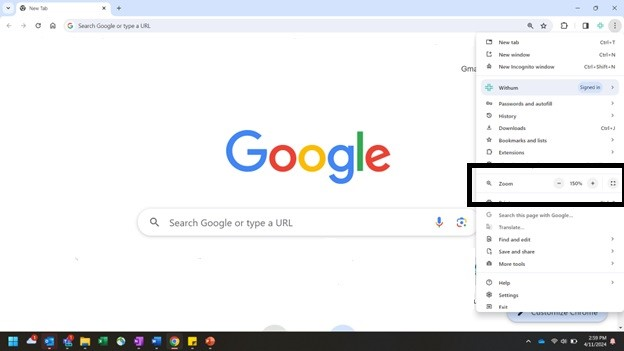
You can verify if the content remains readable, undistorted and functional on the website with the font size increased or set to Large. Most users use the Ctrl and +/- shortcut to quickly zoom in/out on Windows or Mac. In some cases, the images or letters don’t enlarge even when you zoom in, which can be quite a frustrating experience for any user interacting with the site. On your Windows computer, navigate or search System then Display. Under Scale & Layout, increase the scale to 150% or above. On Google Chrome, click on the Zoom option in the browser menu and increase as desired.
Sample Test Cases for Accessibility Testing
- Verify that all images on the website have appropriate alt text for screen reader users.
- Test keyboard accessibility by navigating through the website using only the Tab key.
- Check that all elements in website forms have associated labels to assist screen reader users.
- Ensure that color is not the sole means of conveying important information or instructions.
- Test the website with screen readers like NVDA, JAWS or Mac’s VoiceOver to ensure compatibility.
- Verify that all video and audio content have captions or transcripts for hearing impaired users.
- Check that the website is compatible with different browsers and assistive technology combinations.
- Test the website’s zoom functionality to ensure it maintains usability and readability at various zoom levels.
- Verify that the website is usable with high contrast settings enabled.
- Check that all interactive elements have sufficient indicators for keyboard navigation to focus.
- Verify that all error messages and validation notifications are presented clearly and identifiable for screen readers.
- Test the website’s compatibility with different screen resolutions and sizes.
- Check that the website has logical heading structures to aid users who navigate using headings.
- Verify that all data tables have proper markup and are accessible to screen reader users.
- Test the website’s performance with assistive technologies like screen readers to ensure it remains responsive.
- Check that the website meets the WCAG 2.1 or 2.2 standards.
- Verify that the website has skip navigation links to allow users to bypass repetitive content. Test the website’s compatibility with different operating systems and screen reader/browser combinations.
- Check that the website provides an accessible and descriptive alternative for complex or decorative images.
These steps are a great start to begin your accessibility testing journey! This testing is crucial for ensuring inclusive digital experiences, adhering to standards like WCAG and fostering social responsibility. By embracing accessibility, organizations not only comply with regulations but also contribute to a more equitable society while enhancing their brand image. Moreover, accessibility testing drives innovation, leading to the development of technologies that cater to diverse user needs and future-proof products. Ultimately, prioritizing accessibility creates environments where all individuals can engage, participate and benefit, as well as advancing both social progress and business success. What could be better than that?
Author: Basavaraj Mulagund | [email protected]
Contact Us
Ready to optimize and modernize? Contact Withum’s Digital Workplace Solutions Team today to get practical steps to help you keep up with the digital Joneses.