
Power Apps and Power Automate are two amazing low-code/no-code tools that allow any citizen developer to quickly innovate and solve their business problems without help from IT. Even so, a little advanced knowledge of what to avoid can go a long way in making your first forays into the world of citizen development more successful. To that end, I’ve pulled together my top five power platform mistakes to avoid from my own experience and that of many of our clients.
Top Five Mistakes to Avoid
1. Power Automate – Using a personal account to create mission-critical workflows
Power Automate workflows run with the credentials of the user who created them. The personal credential is just fine for flows that are used by a few people and don’t power mission-critical processes. But if you have flows that large groups of people rely on and/or that run mission-critical processes, you’ll want to create an account specifically for running this flow. This account should be “owned” by your IT Department and have the permissions needed to run the flow and connect to your data sources. Make this account a co-owner of the flow, log into Power Automate as that user and then go into each step with a data connection and switch it to this new account. That way, when the original maker leaves your organization, the flow continues to provide value and there will be no interruption of work.
2. Power Apps – Not paying attention to delegation warnings
Power Apps Canvas Apps work hard to prevent citizen developers from doing things that will tank the performance of their apps or cause excessive amounts of data to flow across their network. One way Power Apps does this is to push the processing of data to the data source as much as possible, which it calls “delegation”. What does this mean for you as a citizen developer? If your data source has more rows than the delegation limit (500 rows by default, though you can increase it to 2,000), you may not be able to pull in all the data you want in the way you want without some extra work. You will normally see a small yellow warning symbol in your app when editing it to let you know that something you are doing will hit the delegation limit and, therefore, you may not get the results you expect. Ignore that warning at your own peril – launching an app with that warning means your users may not be getting the whole data picture. Knowing which column types and data sources work best for your use case is crucial for apps that use data at scale.
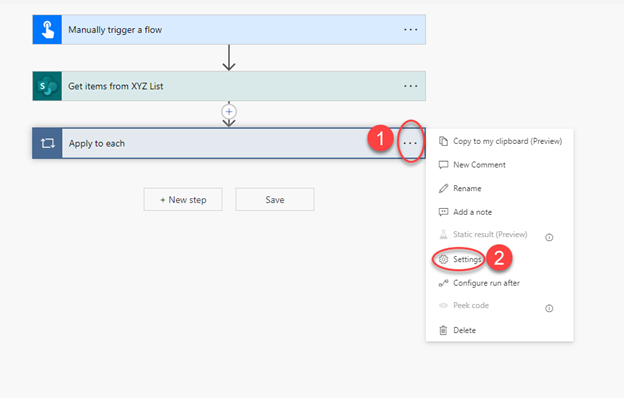
3. Power Automate – Not using the Concurrency Control on apply to each loop
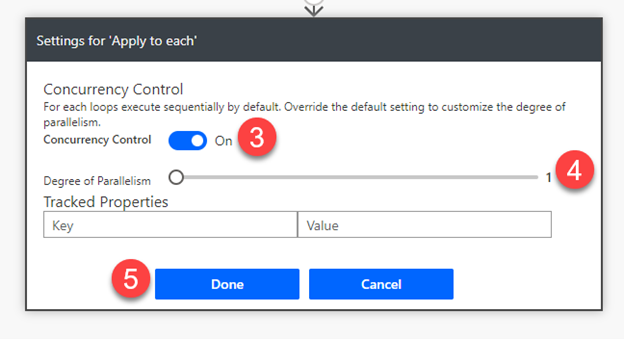
Let’s say you trigger a workflow to get all the items from a SharePoint list and perform some action for each one, such as sending an email to the person who created it. You will use the “Apply to each” action to do this. If you find your workflow takes a long time to loop through everything, you may want to change the Concurrency Control to allow multiple items to be processed at once. Follow the steps below to turn on Concurrency and then set the slider showing “Degree of Parallelism” to some number other than one. You can start with 10 and see if that significantly improves performance.
One warning about Concurrency: if the logic of your loop depends on processing the items in a certain order, or you need to set a value in the loop that you’ll then use outside it (such as a counter or a total), you MUST set Concurrency to one – otherwise your results will be unpredictable.
4. Power Apps – Not using groups and proper naming conventions
Everything you drag and drop onto your Power App Canvas App – text labels, form controls, shapes, icons or layout containers – shows up in the tree view on the left side of the Power Apps Studio screen. And as someone who has built many apps and been asked to update many apps others have built, I can tell you there is nothing more frustrating than trying to find “label4_4” or “ComboBox_34” among 100 other controls. Luckily, Power Apps give us two good ways to handle this.
First, you can – and should – rename your controls. Microsoft has published an excellent guide for the ‘standard’ naming conventions to help you quickly identify what’s what as you wade through potentially hundreds of controls and labels. Following this standard will help you now and make it much easier for someone to come behind you and update the app if needed. Your control names should help someone else know what that control is or what it does. Then you pre-pend some characters to signify what type of control it is. As an example, if you drag a button onto your canvas, and it is automatically assigned the name Button1, you might rename it “btnSubmit” or “btnCancel”. A dropdown might become “drpCategories”, and a text label might become “txtPageTitle”. You get the idea.
Once you have renamed individual controls, look at the way your page is organized. Very likely, it has a header section, a footer section and perhaps a sidebar section. You can easily group all the controls in a section together by selecting them while holding the CNTRL key, right-clicking, and then clicking GROUP. You should give your groups names, such as “grpHeader” or “grpSidebar”. Now everything is easy to find and as a bonus, you can move all the controls in a group around together, too.
Microsoft Whitepaper on Power Apps Standard Naming Conventions.
5. Power Automate – Using the “when an item is created or modified” trigger and then modifying the same item. (Infinite loop warning!)
Let’s imagine that you create a Power Automate flow using the “when an item is added or modified” SharePoint trigger so that when a user changes the Status column in a list, you calculate a value with Power Automate and then write that value back to the item in a different column. But that second “write” also updates the item, so the workflow runs again and writes that same value into the file again. And again. And again.
There are two ways to prevent this from happening. The first is to create a field that stores the previous value of the status column called PreviousStatus (you can hide this field from forms so only the workflow can modify it). Set the default value of the PreviousStatus column to whatever the default value of the Status column is. Then every time an item is created or updated the first step in your flow is a condition that says “if the value in the Status column equals the value in the PreviousStatus column, terminate here; otherwise go on. The last step in your workflow will always be to set the value of the PreviousStatus column to the new value of the Status column.
The outcome of this will be that every time the Status changes on an item, the flow will be triggered, and since the value of the Status and PreviousStatus will be different, whatever steps you have in your flow will execute. The last step will be to make the PreviousStatus column match the status column. The flow will always run one more time for this item, but it will end immediately since the two status fields are now the same.
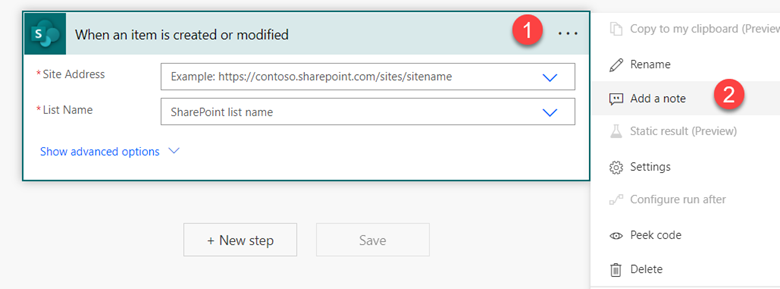
The second way to prevent this from happening is to put that conditional logic into the trigger of the flow. Click the ellipses on the upper right of the trigger condition and click Settings. Near the bottom of the settings page, you can add an expression to make the trigger fire only when a certain condition is met, such as “Status does not equal PreviousStatus”. I’m not going to get into the syntax here – you can read this community article that does a good job of explaining it – but I would offer one note of caution if using this method. Yes, this method is “cleaner,” but it is also hidden, so it is hard to see later why this flow is or isn’t triggering. If you use a trigger condition, it is best practice to add a “note” about it so you or others know exactly what is happening. Just click the ellipsis and choose “Add a note”. You’ll thank me later.
I hope you find these tips helpful as you start work with the Power Platform.