
In this post, we are sharing helpful Microsoft Teams tips and tricks to enhance your Teams collaboration journey. Through our work with various organizations, we gathered commonly requested tips and hacks that will help staff navigate day-to-day while in Teams. Microsoft Teams provides many ways to do things and we narrowed it down to 10 tips and tricks to help your organization adopt Teams.
1. What’s New and Different From What I Currently Use
Once team members hear about the launch of Microsoft Teams, they will immediately ask, “What’s going to happen to my tools?” Microsoft 365 offers a very familiar experience to what you are currently using but better. Make it easier for your staff to understand how their current toolset translates to Microsoft Teams. Working with decision owners before launching Teams is critical for your success. Make it simple for end-users to understand how their current tools translate into Microsoft Teams. Use the example below as part of your planning and follow up with governance decisions and end-user communications.
| Current Tool | Function | M365 Alternate |
|---|---|---|
| DropBox | Cloud file storage/File Sharing | OneDrive/Teams |
| Google Workspace | File Sharing and Collaborative Authoring | Teams |
| Network file shares | Internal file sharing | SharePoint, Teams, OneDrive |
| Slack | Chat | Teams – Chat and Posts |
| Zoom | Online Meeting | Teams Meetings |
2. Avoid Being Disturbed
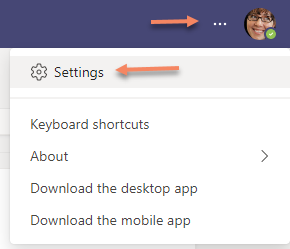
Sometimes you might want to filter out the distractions so you can give your full attention to the chat at hand, with no worry of being disturbed by alerts.
To do this, select the three dots “…” next to your profile picture (top right corner) then select Settings > Notifications tab to change the type and frequency of your alerts.
3. Teamwork Makes the Dream Work with Co-Authoring in Microsoft 365
In Microsoft 365, you and your team members can co-author Word, PowerPoint, or Excel documents or comment on Visio files that have been uploaded and shared to Teams. When everyone is working at the same time, that’s called co-authoring.
With this feature, there is no need to check files out or worry about if one of your colleagues has the document open. Just open the file you need to edit and if other team members are editing it too your changes will be seamlessly merged as you work – and you can see who edits in real time! This experience is the same for internal or external parties. When inviting external parties, they do not need a Microsoft account or any Microsoft desktop apps; they can easily collaborate in the browser while you work in your desktop app.
4. Completing Your Teams Profile
With the rise in the work from home environment, perfecting your Teams profile has become critical in maintaining communication in the workplace. Here are a few things to keep in mind as you perfect your profile:
- Profile picture
- Having a good profile picture makes it easier for your colleagues to identify you. Select your account in the upper right corner and select manage account. Once in account settings, click on your account bubble to add or update your profile picture.
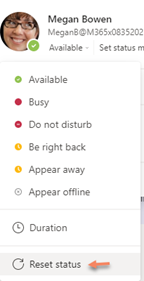
- Status messages
- Did you know that if you manually change your status and come back to your desk, you will need to reset it? Select “reset status” from the status bar to ensure that your profile shows the correct availability.
Any good meeting is engaging, energetic and most importantly, productive. No one wants to go to another meeting that could have easily been an email or Teams thread instead. To guarantee an outstanding Teams meeting, utilize the following tools:
- Creating polls: You can use Microsoft Forms to send polls to gather feedback quickly during or post meeting. Polly, a third-party app through Teams, is also another fun options that can automate polls through scheduling.
- Breakout rooms: Workshop-style meetings can be engaging with exercises in breakout rooms. Read more about setting up breakout rooms.
- Roles: If you’re organizing a meeting with multiple attendees, you may want to assign roles to each participant to determine who can do what in the meeting. There are two roles to choose from: presenter and attendee. Presenters can do just about anything that needs doing in a meeting, while an attendee’s role is more controlled.
- Raise Hands: Microsoft recently came out with an ordered raised hand participants list. Use the order to prioritize participant speaking opportunities.
- Recording: Record your meetings for participants who couldn’t join. You will be able to retrieve your recordings post-meeting in your OneDrive and the recording will be available in the meeting chat.
6. Searching in Teams – Chat
Using Teams to communicate with you coworkers is effortless and makes it easy to have meaningful conversations. This ease, however, can lead to an issue of trying to find a specific detail mentioned in a lengthy chat thread. Instead of scrolling through and re-reading everything to find the item, you can use search within the conversation. The quickest way to search in your chat is to do the following:
1. Choose the area you want to search—for example, a recent chat or the General channel within a team.
2. PressCtrl+Ffollowed by your search terms, then pressEnter. The search results will be displayed from within that chat or channel conversation.

3. Choose any one of the available results and Teams willscroll up to the location of that message.
7. Searching in Teams – Filtering Results
After you’ve entered your search terms into the search box, use the Messages, People, or Files tabs above your results to refine your search. Another tier of filters will appear after you make your initial selection, providing a search option for more granular results.
For example, if you select Messages, you can filter by who the message is from, where the message is, and more.
8. Best Practices for Managing Your Teams Hub
Teams is an excellent tool for communicating, collaborating and creating, but sometimes it can also be overwhelming. To prevent becoming overwhelmed when using your Teams hub, follow these simple steps for hiding and unhiding teams:
- Hiding teams – Find the group that you would like to hide. Hover your mouse over the group, then click the ellipsis (…) on the far right of the group name. Next, click on the “Hide” button. This team is now hidden and will appear in a new category of Teams will appear called “Hidden teams”.
- Unhiding teams – Click open the “Hidden teams” category. Find the team you would like to unhide and hover your mouseover the group. Click on the ellipsis and then click on the “Show” button. The team will now show and be removed from the “Hidden teams” category.
There are many ways to streamline your Teams experience, making it your ideal workplace, but the handiest method is the ability to “Pin” important chats or teams. Pinning these items allows them to live at the top of your Teams page, making them easy to find and update. To pin important items, follow thesesimple steps:
- Pinning your items – Find the chat or team you would like to pin. Hover your mouse over the chat/team, then click the ellipsis (…)on the far right of the chat/team name. Next, click on the “Pin” button. This chat/team will now be pinned to the top of the page.
- Unpinning items-Find the chat/team you would like to unpin and hover your mouseover the chat/team name. Click on the ellipsis and then click on the “Unpin” button. The chat/team will be removed from the top of the page.
9. Unlock Advanced Options Everywhere
Throughout Microsoft Teams, you will notice three dots, and when you hover over them, they give you a lot of great options for advanced features.Let’s explore where these hidden gems can be found:
- Top-right by your profile
- Hover over a chat
- Hover over a team/channel
- Hover over a conversation

10. Further Your Knowledge in M365
The final Microsoft Teams tip we offer is to utilize the Microsoft learning/supporting documentation. Microsoft provides excellent resources that can help users as they navigate through the plethora of Microsoft products. Some of our favorites are:
- Microsoft Support – This site focuses on Microsoft Teams, and provides an easy-to-use Knowledge Base
- Microsoft Documentation – Use this site to learn about all things Microsoft
- Teams Help – Within Microsoft Teams you can find a Help button on the bottom left corner that includes snippets of training videos and updates on new features.